How to Set Up Payment Method
Before proceeding to this step, you must first configure your Cybersource account username and password.
How do I configure my Cybersource accounts?
- Your Organization ID is provided in the confirmation email you receive. The Organization ID is a unique identifier assigned to your organization when you sign up for a Cybersource account.
- For assistance with your Cybersource account, please refer to Baiduri Bank.
- Maribali only provides the guide for payment gateway integration, which is covered in this article.
PAYMENT CONFIGURATION
Create a Secure Acceptance Profile in Cybersource.
A Secure Acceptance profile consists of settings that you configure to create a customer checkout experience. You can create and edit multiple profiles, each offering a custom checkout experience. For this purpose, we will create only 1 profile for Maribali checkout experience.
- Log in to the Cybersource Business Center with the credentials you created.
- Link to login to the TEST environment here: https://ubctest.cybersource.com/ebc2/
- Link to login to the LIVE/PRODUCTION environment here: https://ubc.cybersource.com/ebc2/
3. Once you logged in, go to Payment Configuration at the side bar, click onto Secure Acceptance Settings.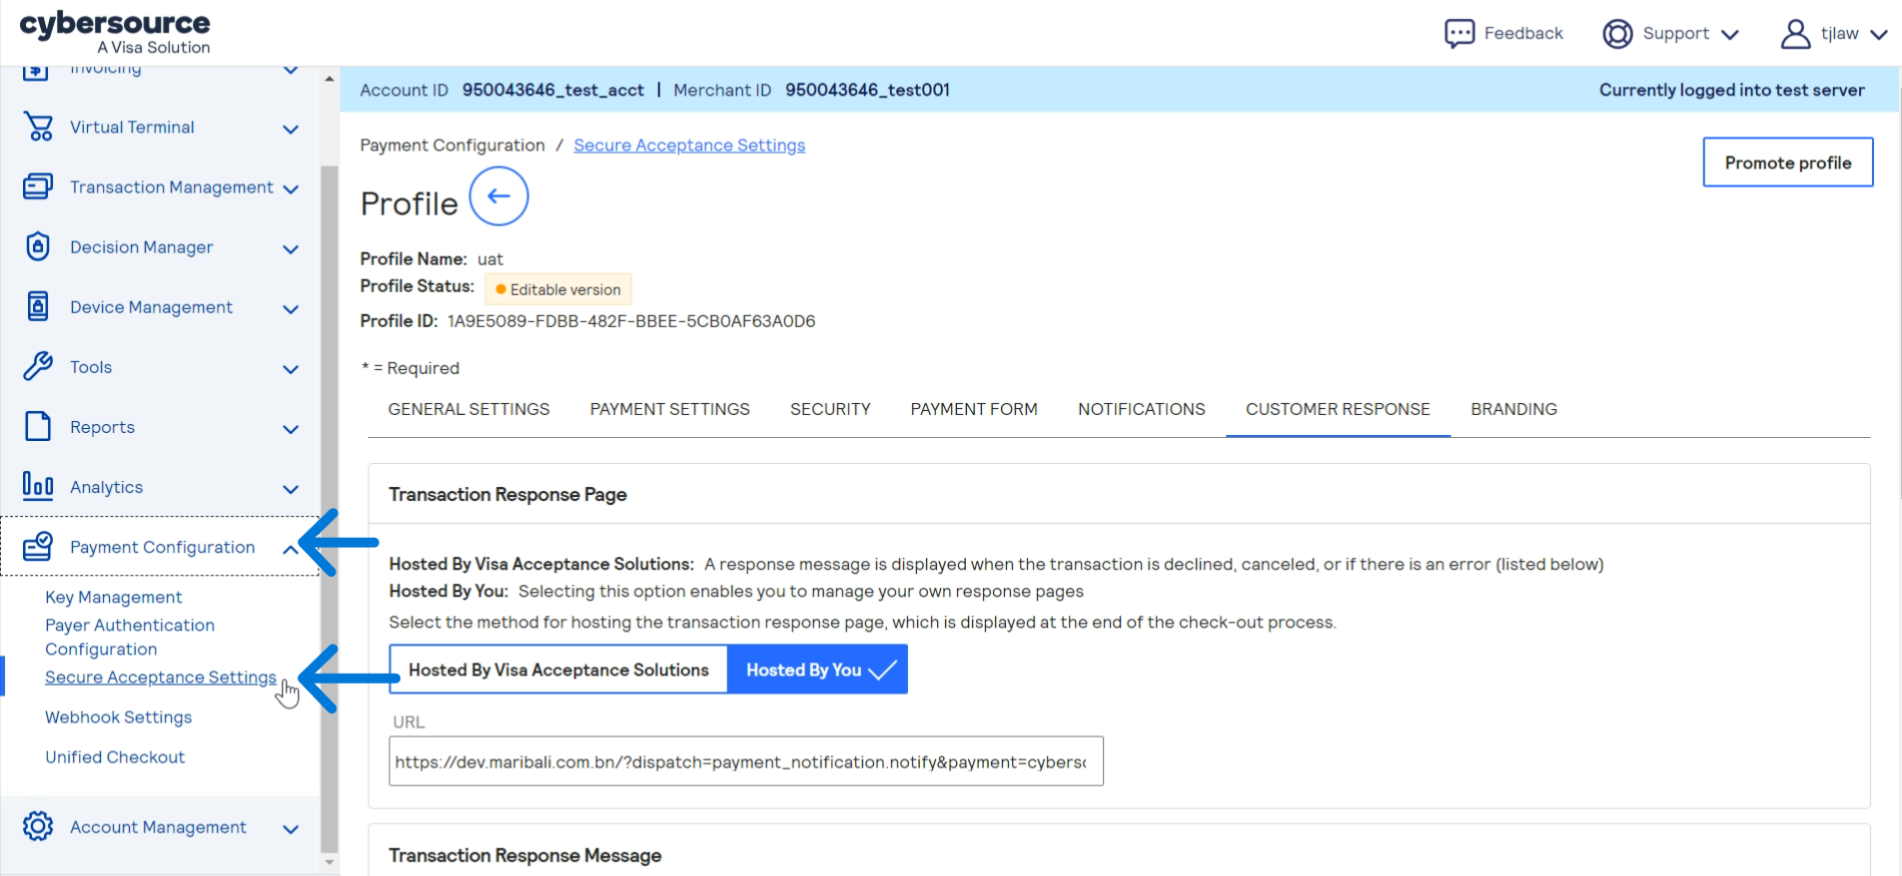
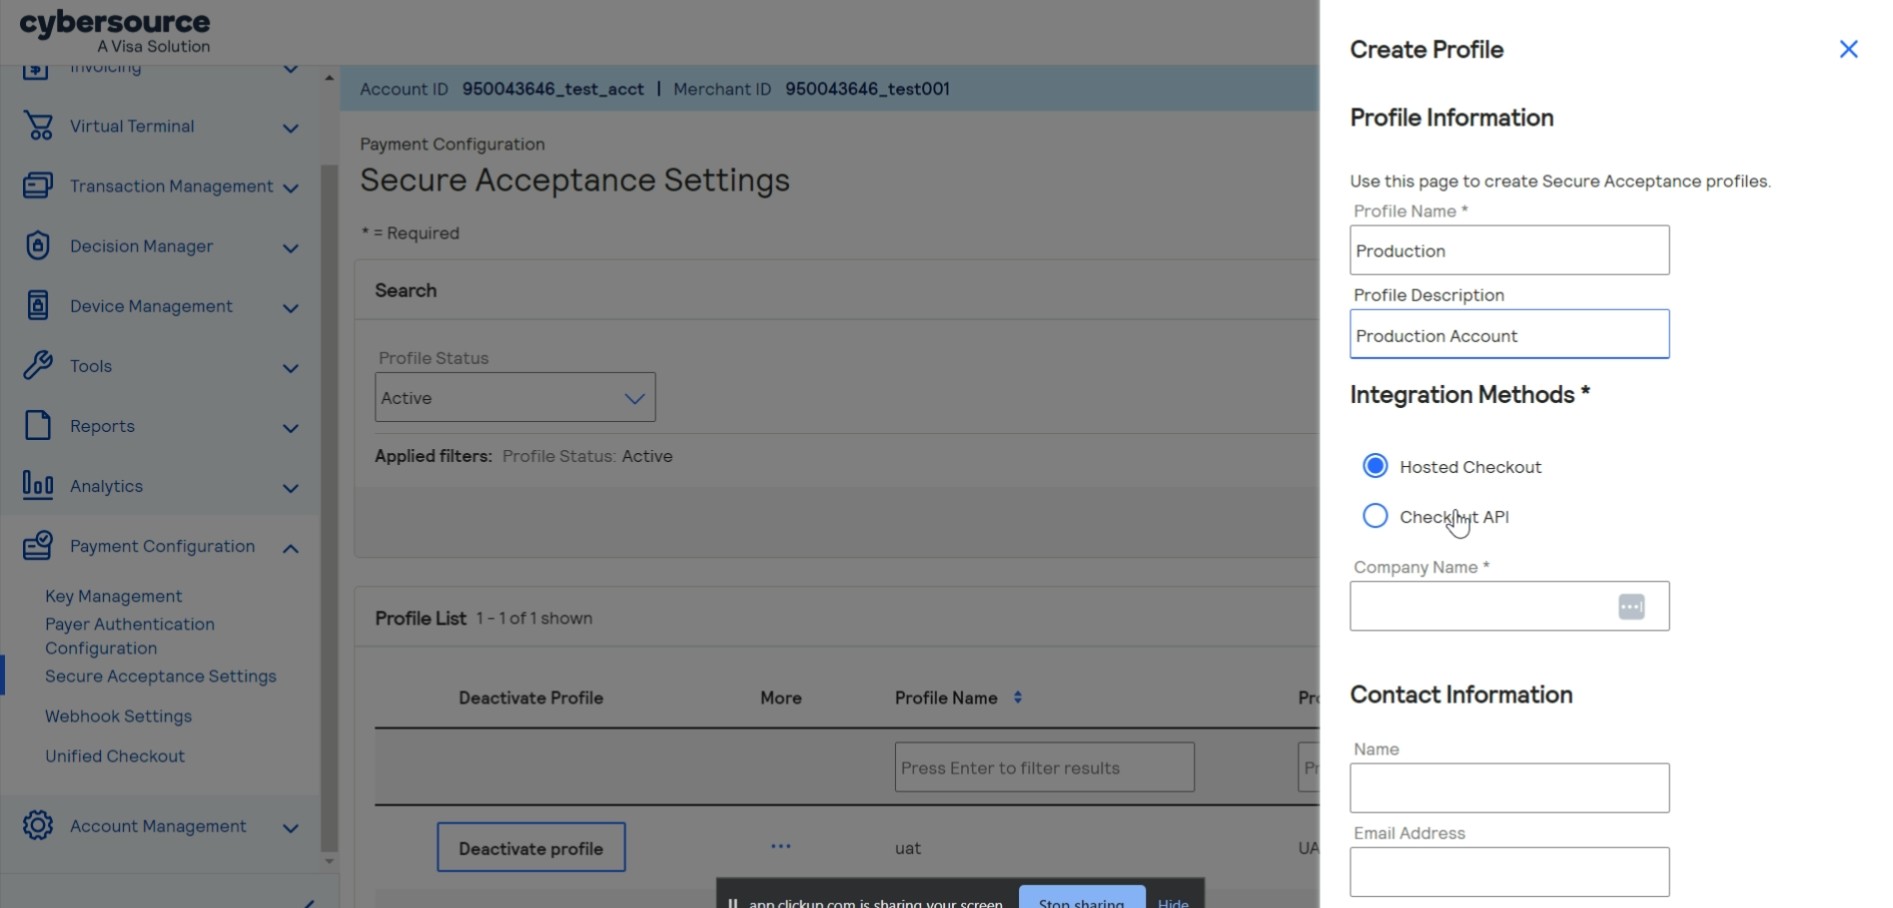
4. Click onto + New Profile at the top right, and fill in the details;
- Profile Name: Production
- Profile Description: Production_acc
- Company name: vendor’s company name
- For Integration Methods, leave ‘Hosted Checkout’ selected.
- Contact information: leave blank
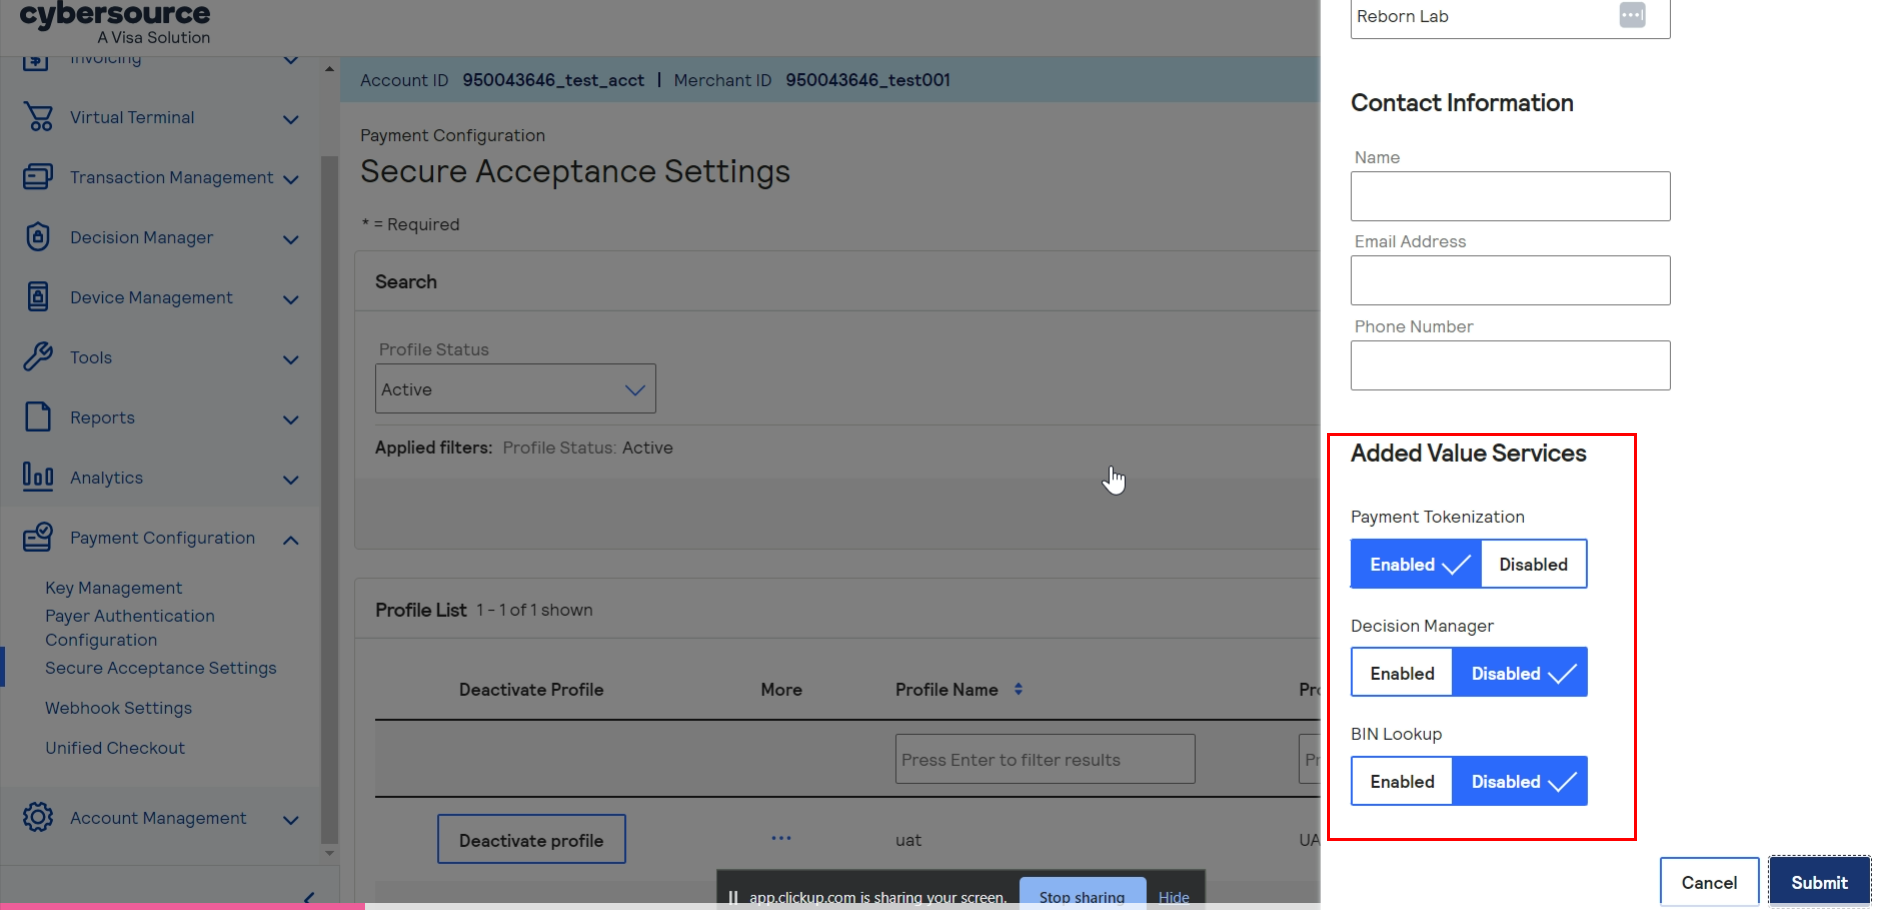
Under Added Value Services;
- Enable the Payment Tokenisation.
- Leave ‘Decision Manager‘ disabled.
- Leave ‘BIN Lookup‘ disabled.
- Click ‘Submit‘.
Click Submit.
5. Your profile will be created.
PAYMENT METHOD CONFIGURATION
Adding Card Types and Currencies
6. Click onto the Payment Settings and remove(-) the rest of the card type except for Visa, Mastercard, Unionpay and AMEX.
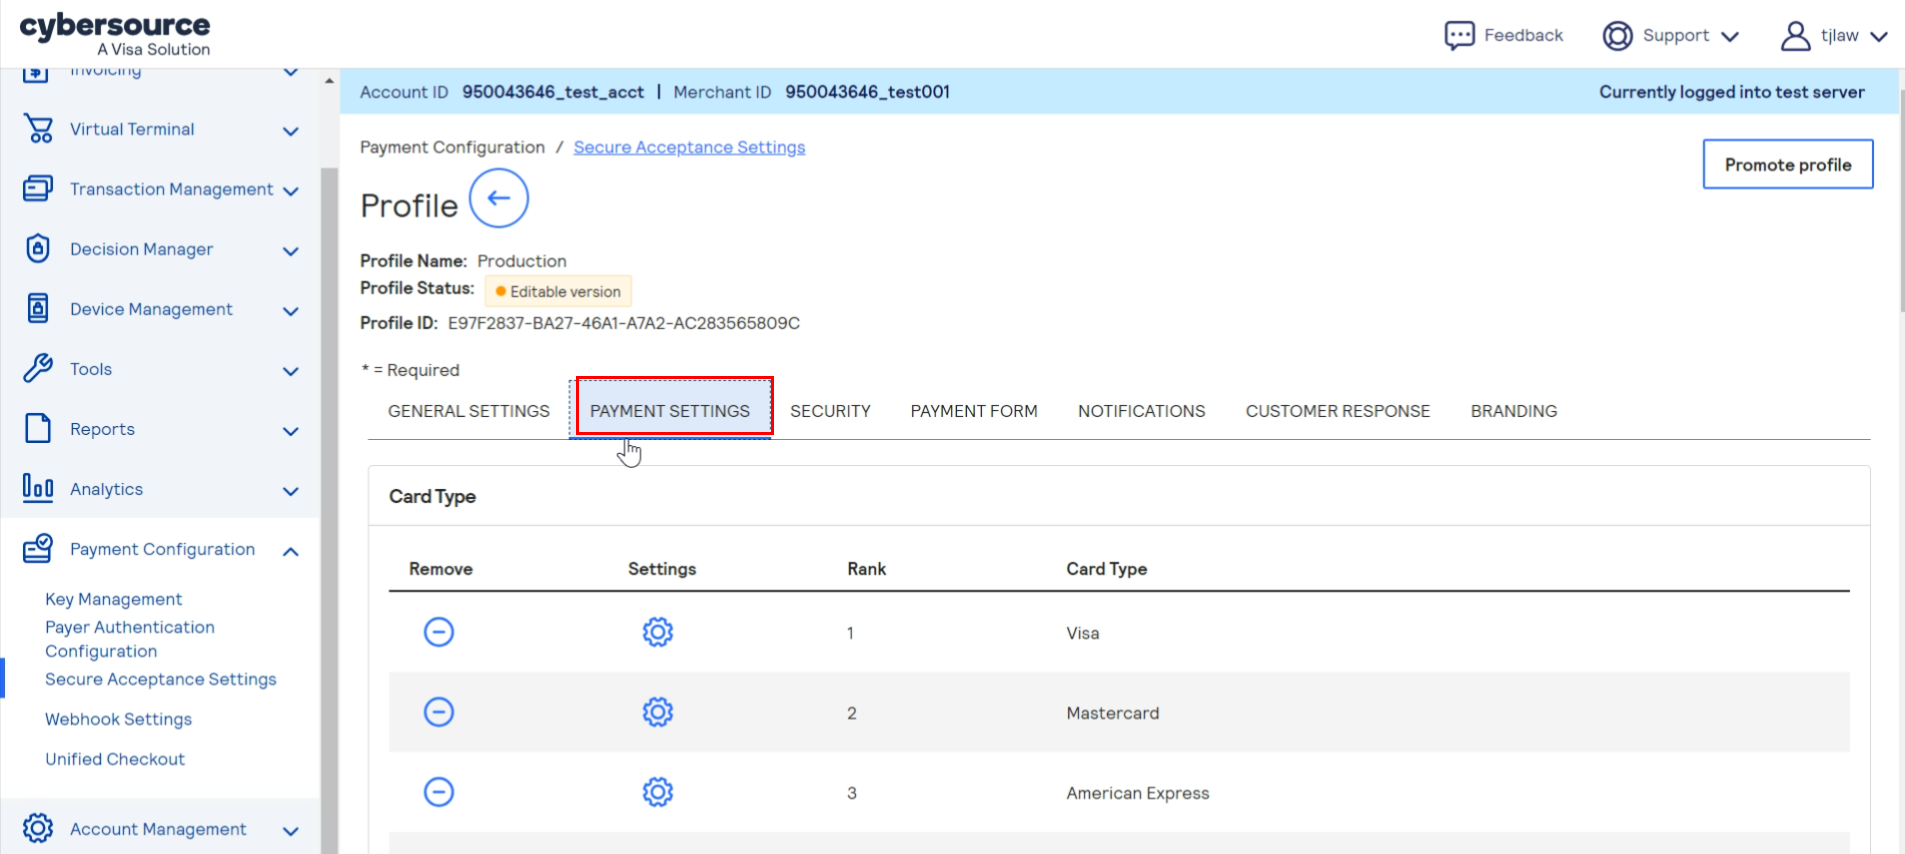
6.1 In the same tab, under Automatic Authorisation Reversal, enable the below:
- Fails CVN Check
The card verification number (CVN) is a three‑ or four‑digit number that helps ensure that the customer possess the card at the time of the transaction.
6.2 While in Payment Settings, select the Settings (Gear Icon) on each card, and check(tick) all three checkboxes.
- CVN Display
- CVN Required
- Payer Authentication
Repeat step 6.2 for each card (Visa, Mastercard, American Express, Union Pay).
Click Save once done.
7. Click the settings icon for each card type. The card settings and currencies lists appear. Select ALL CURRENCY. Repeat step 7 for each card (Visa, Mastercard, American Express, Union Pay).
Click Submit. The card types are added as an accepted payment type.
Click Save.
SECURITY KEYS
Before you can activate a profile, you must create a security key to protect each transaction from data
tampering. A security key expires in two years.
You cannot use the same security key for both test and production transactions. You must download
a security key for each version of Secure Acceptance for test and production.
CREATING SECURITY KEYS
8. Go to Security tab, and click Create Key.

8.1 For the Key Name:
- enter ‘live_key’ if you logged into the LIVE site.
- enter ‘dev_key‘ if you logged into the TEST site.
- Choose signature version 1 (default).
- Choose signature method HMAC-SHA256 (default).
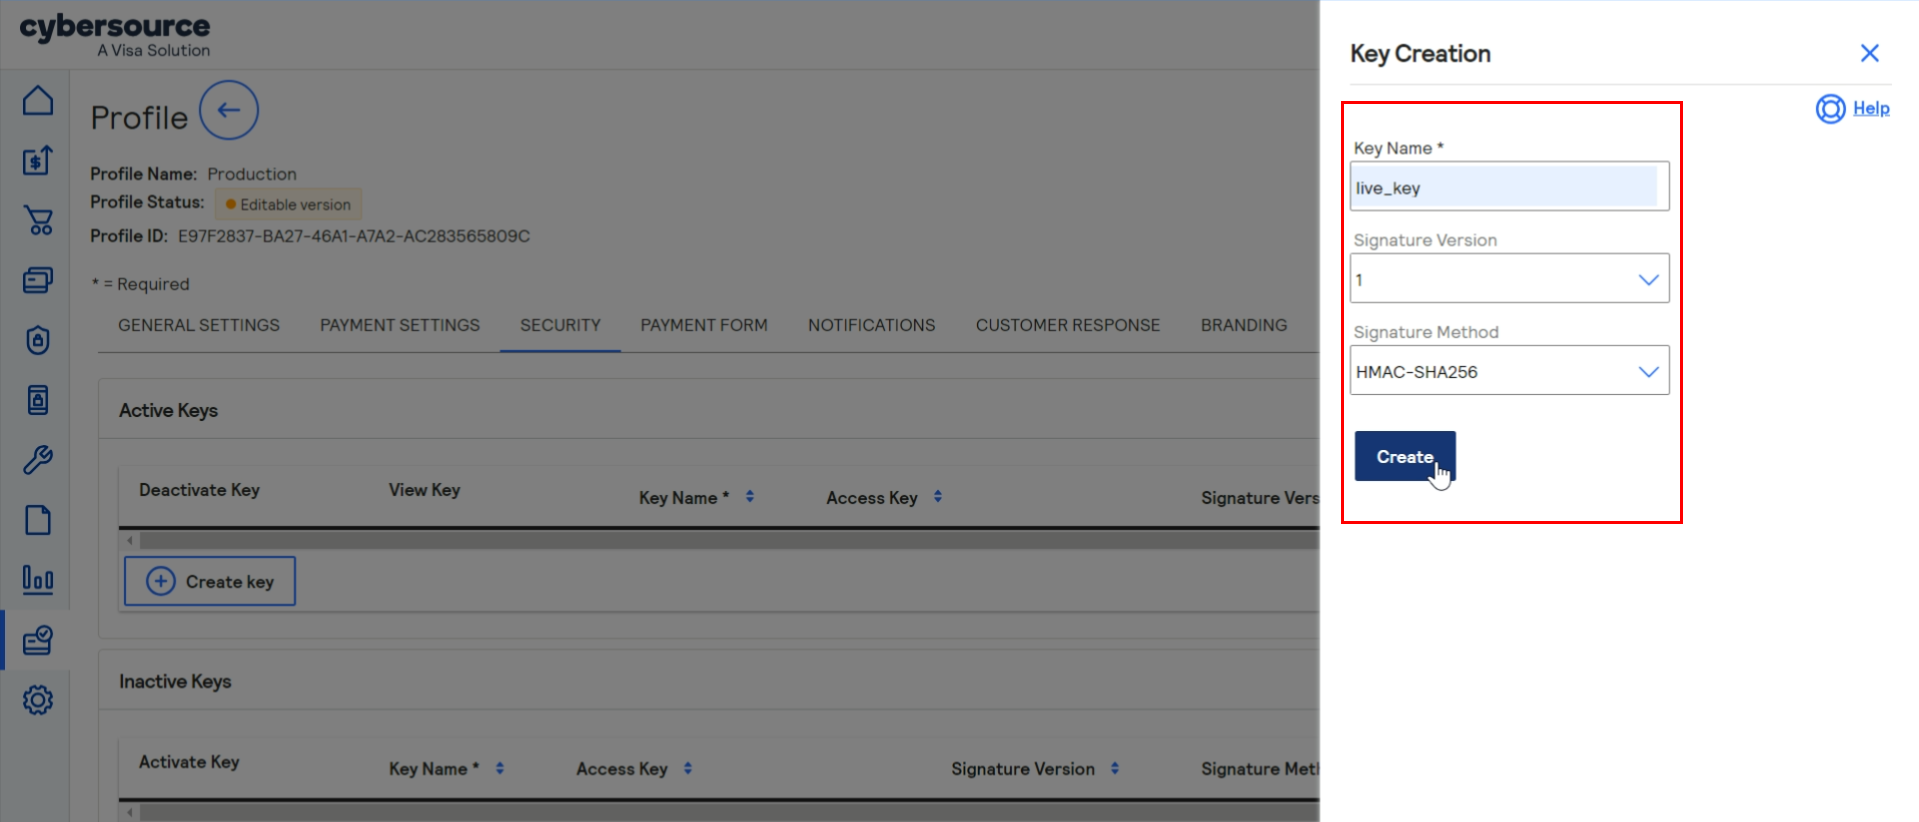
Click Create.
8.2 Click Confirm. The Create New Key window expands and displays the new access key and
secret key. This panel closes after 120 seconds. Copy and save or download the access key and secret key.
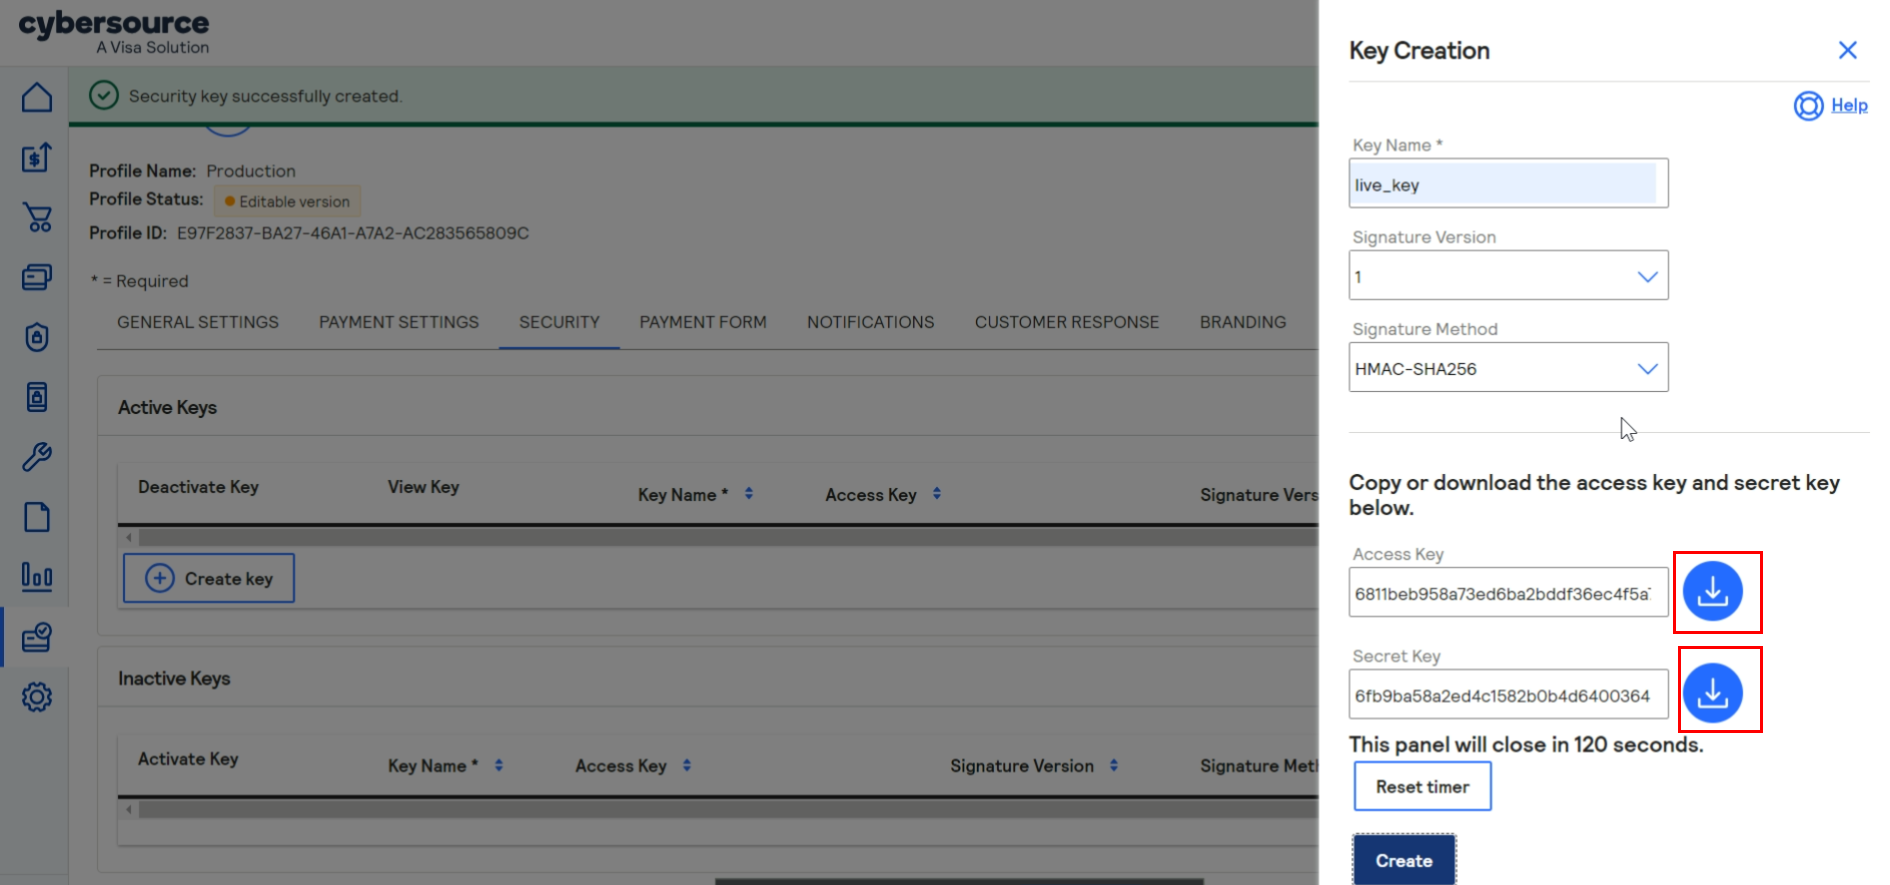
Important: When done pasting the secret keys into your script, delete the copied
keys from your clipboard or cached memory.
8.3 Click ‘create‘ once done.
CHECKOUT CONFIGURATION
The payment form is the customer’s checkout experience. It consists of either a series of pages or
as a single checkout page in which the customer enters or reviews information before submitting a
transaction.
Configuring the Payment Form
9. Go to Payment Form tab and Enable:
9.1 Payment Form Flow
- Select Multi-Step Payment Form.
- Tick the Display The Total Tax Amount in each step of the checkout process.

9.2 Checkout Steps
- Disabled the Billing & Shipping Information

9.3 Payment Information
- Tick Mark Sensitive
9.4 Order Review
- Set Billing as Display only.
- Shipping as Display only.
- Payment Information as Display only (enabled by default).
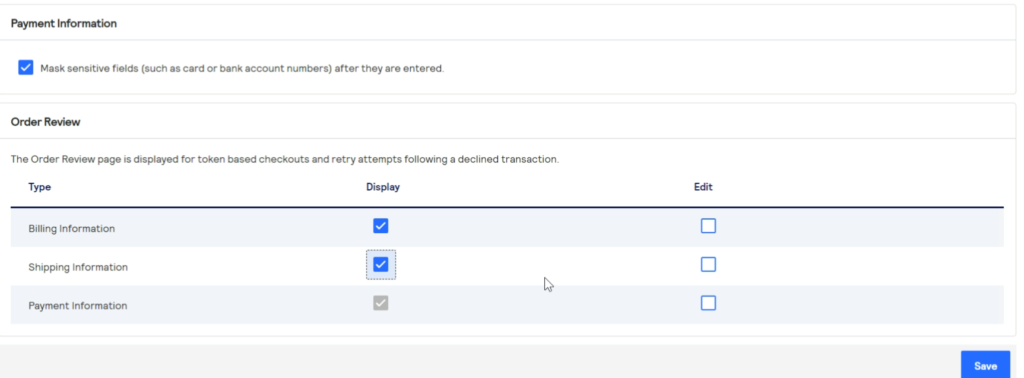
Save your changes.
CUSTOMER RESPONSE PAGE
You must configure the customer response page before you can activate a profile.
You can choose to have a transaction response page displayed to the customer at the end of the
checkout process, and a cancel response page displayed during the checkout process.
10. Go to Customer Response tab
10.1 Transaction Response Page
- Enable Hosted by You and paste the Dispatch URL:
For Live: https://maribali.com.bn/?dispatch=payment_notification.notify&payment=cybersource
For Test: https://dev.maribali.com.bn/?dispatch=payment_notification.notify&payment=cybersource

10.2 Custom Cancel Response Page
- Enable Hosted by Visa Acceptance Solutions

10.3 Custom Redirect After Checkout
For Live: https://maribali.com.bn/?dispatch=payment_notification.notify&payment=cybersource
For Test: https://dev.maribali.com.bn/?dispatch=payment_notification.notify&payment=cybersource
Save your changes.
11. Click Promote Profile

Cybersource Integration into Maribali vendor account
Next, you will need to integrate your cybersource account in your Maribali account.
- Log in as Vendor: https://maribali.com.bn/vendor.php?dispatch=auth.login_form&return_url=vendor.php
2. Go to Settings and click onto Payment Methods
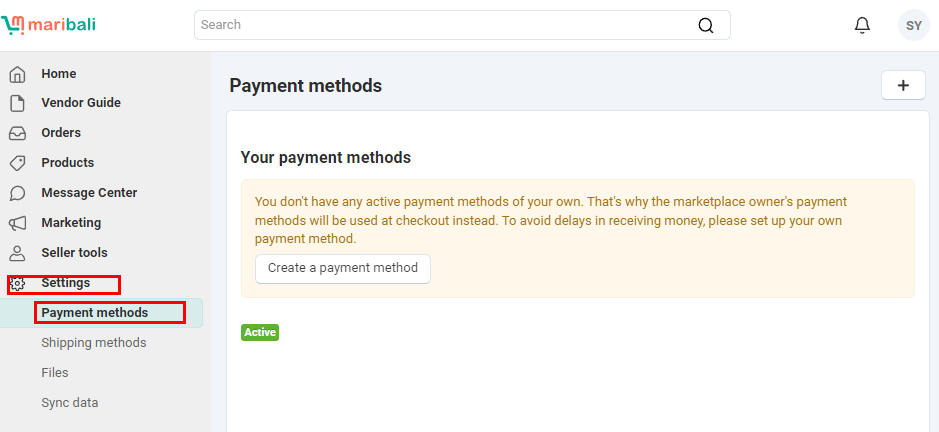
3. Click Create a Payment Method
For the processor, click onto cybersource and fill in the details from the Configure tab.
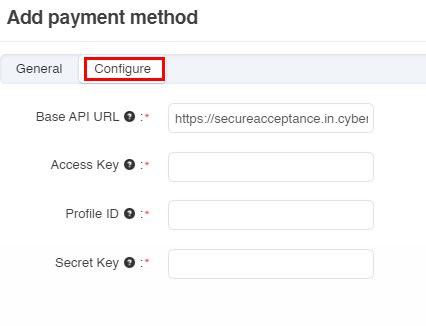
Enter the key you downloaded earlier in Step 8.2.
For Profile ID, copy the Profile ID from the Profile page in your Cybersource Business Center account.
Click ‘Create‘ once done.
Once successful, you will be able to see ‘Payment by card‘ listed as an active payment method.
Congratulations, your store now has an active payment method!
Your customers will be able to make payment to you directly by using their bank cards. Visa, Mastercard, American Express and Union Pay is accepted.
In case you did not manage to download the keys, you can retrieve the keys by doing the following:
- Login to your Cybersource account
- Click on the profile you created
- Switch to ‘Security’ tab.
- Under Active Keys, you can find the key you created earlier. Select it and download the Access Key and Secret Key.
- For your Profile ID, you can retrieve it at the Profile page.
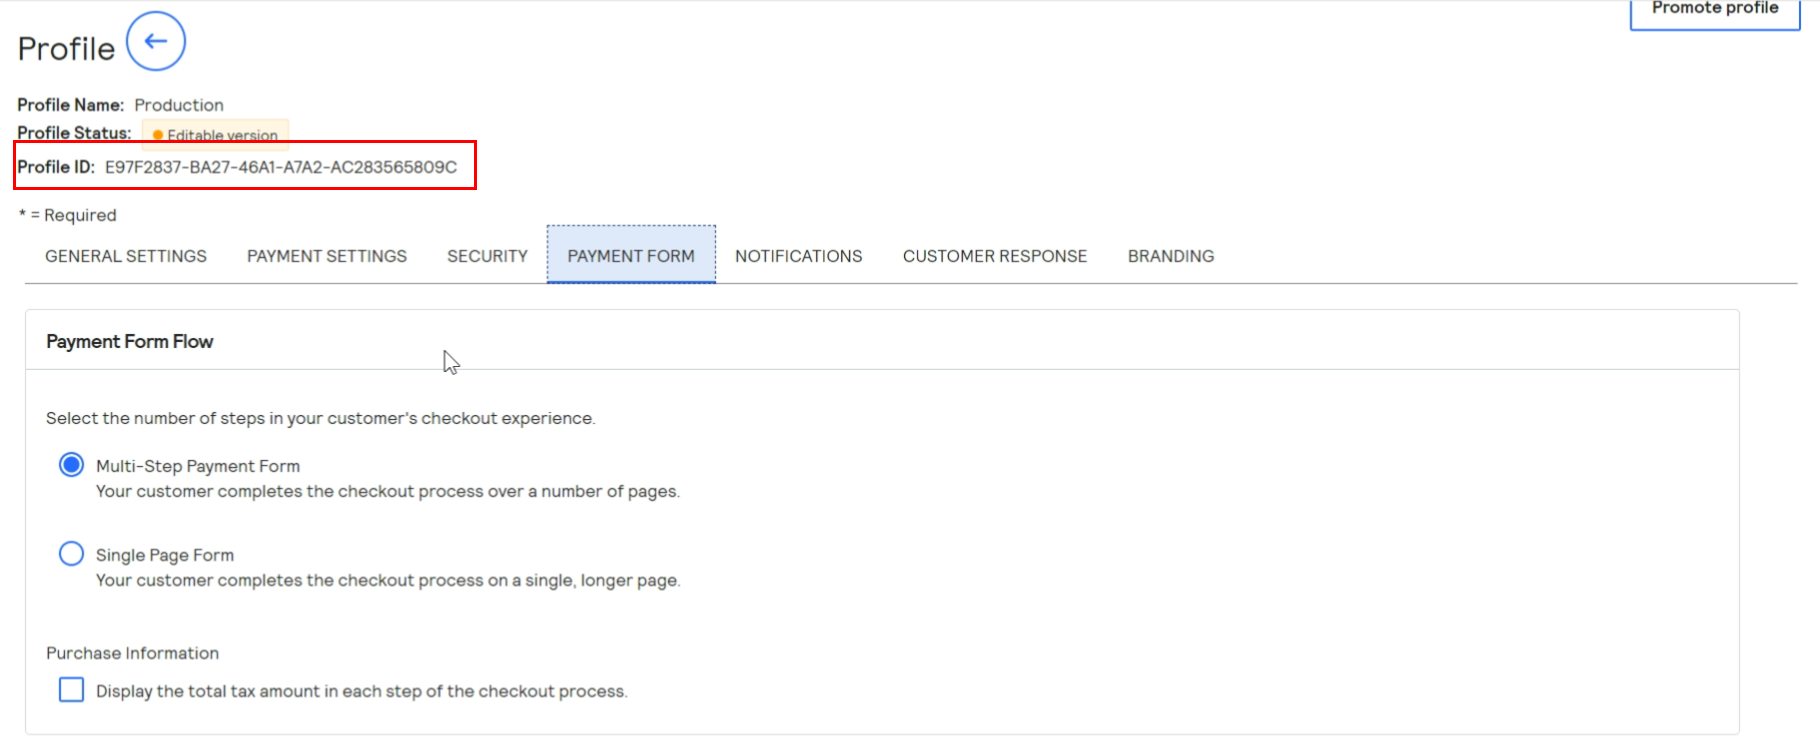
Copy and paste it into the payment method field.